Velux roof windows are a popular choice in many UK homes, providing natural light and ventilation to loft conversions and extensions. Over time, these windows may require replacement due to wear and tear, damage, or simply to upgrade to more energy-efficient models. The good news is that you don't always need to replace the entire window structure – in many cases, you can replace just the window pane while keeping the original frame intact. This guide will walk you through the process of replacing a Velux window without removing the frame.
Understanding velux window replacement options
Before diving into the replacement process, it's important to understand when a partial replacement might be appropriate versus a complete window overhaul. Velux windows typically last between 20-30 years, but the glass pane may need replacing before the frame reaches the end of its lifespan. Knowing your options can save you time, effort, and money.
Signs it's time to replace just the pane
There are several indicators that your Velux window pane needs replacing while the frame remains structurally sound. Excessive condensation between panes is a clear sign that the seal has failed and moisture is trapped within the window. This not only affects visibility but can lead to mould growth over time. Visible damage such as cracks or chips in the glass necessitates immediate replacement for safety and insulation purposes. You might also notice a cloudy appearance developing on older panes, which cannot be cleaned away as it occurs within the sealed unit. Drafts around the window area suggest that the window is no longer providing adequate insulation, though this could also indicate issues with the frame sealing that should be addressed during the replacement process.
Benefits of partial replacement versus full frame removal
Opting to replace just the window pane rather than the entire Velux unit offers several advantages. The most obvious benefit is cost-effectiveness – a partial replacement requires fewer materials and less labour, potentially saving hundreds of pounds compared to a full window installation. Modern replacement panes often feature improved thermal and acoustic insulation properties compared to older models, enhancing the comfort of your home without the disruption of a complete window replacement. The energy efficiency benefits can be substantial, with newer glass technologies helping to retain heat during winter and reflect excess heat during summer, potentially reducing your energy bills. Additionally, this approach allows you to upgrade the performance of your window without the extensive work involved in removing and replacing the entire frame, making it an attractive option for homeowners seeking improvements without major renovation work.
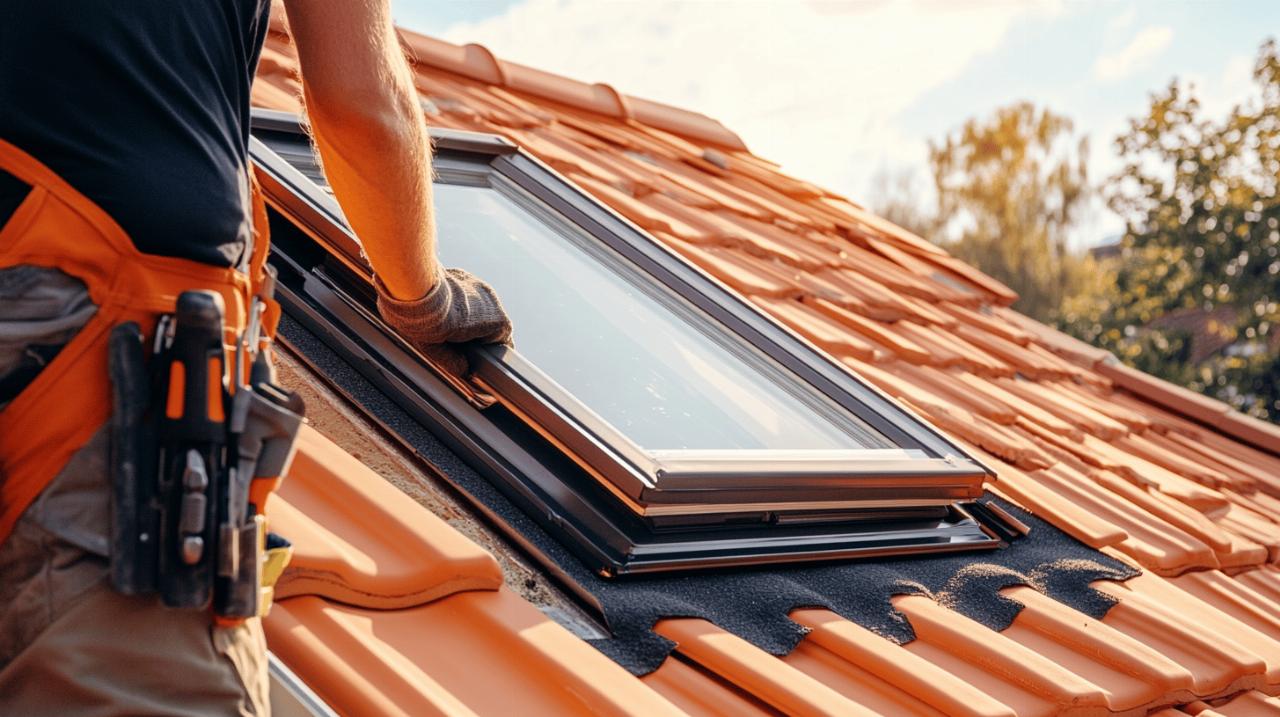
Essential Tools and Materials for the Job
Proper preparation is crucial for a successful Velux window pane replacement. Gathering all necessary tools and materials before starting will help ensure a smooth process and professional results. For this job, you'll need several essential items to work safely and effectively at height.
Measuring and selecting the right replacement pane
Accurate measurements are critical when ordering a replacement pane for your Velux window. You'll need to measure the existing window pane dimensions precisely, noting both the visible glass area and the overall sash size. The model number of your Velux window, usually found on a plate on the frame, will help identify the correct replacement parts. When selecting a new pane, consider the various glass options available, such as enhanced thermal insulation, noise reduction, or safety glass depending on your specific needs. Many suppliers like Sunlux Roof Windows and YARD Direct offer a range of Velux replacement parts with different performance characteristics. It's advisable to consult with specialists if you're uncertain about compatibility, as using the same size replacement makes installation significantly easier. Remember that changing the size or specifications might require professional consultation and potentially more extensive modifications.
Safety equipment and specialist tools needed
Working on roof windows involves certain risks, so proper safety equipment is non-negotiable. You'll need sturdy gloves to protect your hands from glass and sharp edges, safety goggles to shield your eyes from debris, and a reliable ladder that reaches your roof window comfortably and securely. For the actual replacement work, gather essential tools including a screwdriver set with various head types, a utility knife for removing sealant and gaskets, a small crowbar or pry bar for careful removal of trim pieces, a tape measure for verification of dimensions, and a spirit level to ensure the new installation is perfectly aligned. You'll also need appropriate sealant compatible with Velux windows to ensure weatherproofing after installation. Having a helper during the process is highly recommended, not just for safety when working at height, but also for practical assistance when handling the glass pane and holding items in place during installation.
Step-by-step pane replacement process
 With your tools and materials gathered, you can begin the actual replacement process. Following a methodical approach will help ensure success and minimize the risk of damage or injury. This section breaks down the process into manageable steps that a capable DIYer can follow with appropriate assistance.
Removing the old window pane safely
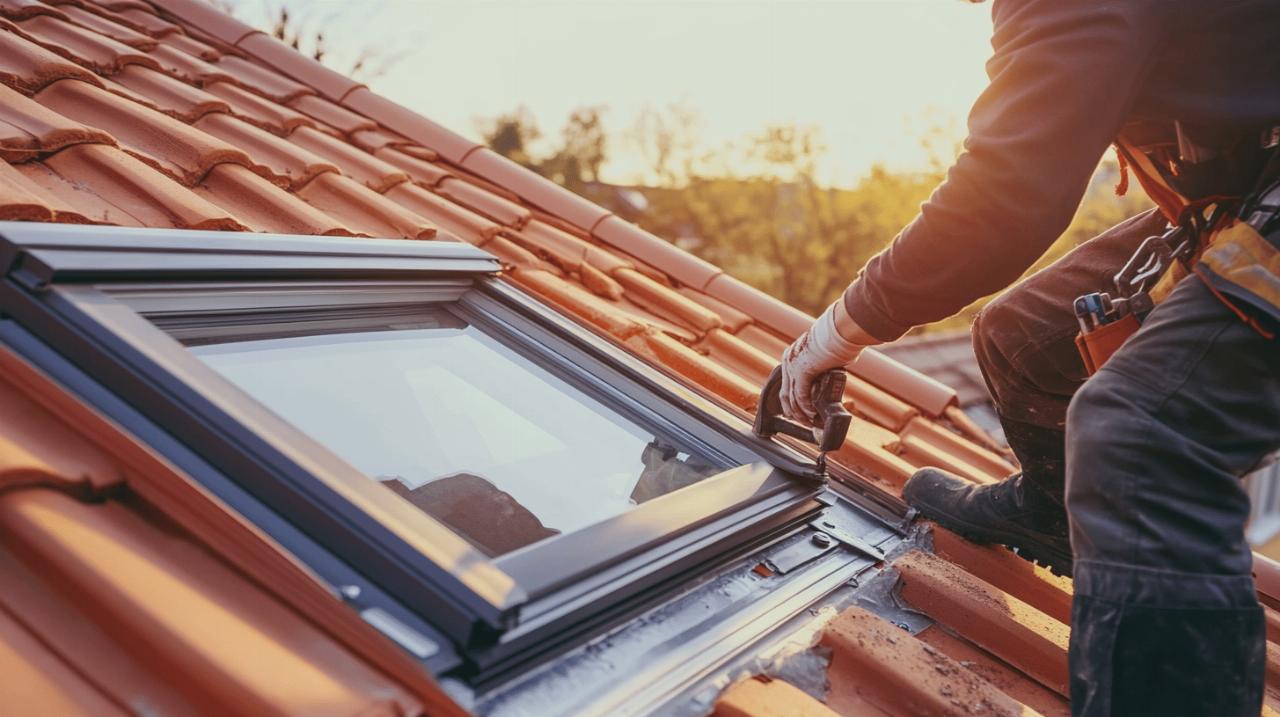
The first step is to thoroughly clean around the window to prevent debris from falling into your home during the replacement process. Open the window fully to access all parts of the frame and sash. Carefully remove any trim pieces or glazing bars that secure the glass pane, setting these aside in a safe place as they'll be reused during reinstallation. Next, locate and remove the glazing clips or screws holding the glass unit in place, working methodically around the perimeter of the window. Once all fasteners are removed, the glass unit should be free to separate from the frame. This is where having an assistant becomes invaluable – one person should support the glass from inside while the other carefully loosens it from the frame. Exercise extreme caution when handling the old glass pane to avoid injury. If the pane is damaged or cracked, apply adhesive tape across the surface to hold fragments together during removal. Once free, carefully lower the old pane and set it aside for proper disposal, being mindful of local regulations regarding glass recycling.
Installing and sealing the new pane properly
Before installing the new pane, thoroughly clean the frame channel where it will sit, removing any old sealant or debris. Check that the replacement pane matches your measurements and specifications exactly. Apply new weatherstripping or gaskets according to the manufacturer's instructions to ensure a weather-tight seal. With the help of your assistant, carefully position the new glass unit into the frame, ensuring it sits correctly in the channel on all sides. Reinstall the glazing clips or screws that secure the glass, working in a diagonal pattern to ensure even pressure on the pane. Do not overtighten, as this could stress the glass. Once the pane is secured, replace any trim pieces or glazing bars in their original positions. Apply appropriate sealant around the edges where the glass meets the frame, creating a continuous bead without gaps that could allow water penetration. Smooth the sealant with a suitable tool to create a neat finish and ensure proper adhesion. Allow the sealant to cure according to the manufacturer's recommended time before fully operating the window or exposing it to water.
Finishing touches and maintenance tips
After installing your new Velux window pane, some final steps and ongoing maintenance will help ensure its longevity and optimal performance. Proper care can extend the lifespan of your window and maintain its energy efficiency benefits for years to come.
Testing for proper function and weatherproofing
Once the sealant has cured, it's essential to thoroughly test the window to ensure proper installation and function. Open and close the window several times to verify smooth operation without binding or resistance. Check that the handle and any locking mechanisms work correctly and securely. Inspect the entire perimeter of the new pane from both inside and outside for any gaps in the sealant that might allow water penetration. During the next rainfall, monitor the window closely for any signs of leakage around the new pane. If you discover any issues, address them promptly before they lead to more significant problems. Consider performing a simple water test by gently spraying the exterior of the window with a hose, starting from the bottom and working upward while someone inside checks for any water ingress. This controlled testing can reveal potential problems before natural weather conditions do.
Caring for your new Velux window to extend its lifespan
Regular maintenance will help maximize the lifespan of your newly replaced Velux window pane. Clean the glass periodically using appropriate non-abrasive glass cleaners and soft cloths to maintain clarity and remove potential contaminants. Inspect the seals and gaskets annually for signs of deterioration or hardening, as these components are crucial for weatherproofing. Lubricate any moving parts like hinges and handles annually with a silicone-based lubricant to ensure smooth operation and prevent wear. Consider adding Velux blinds not only for light control but also for additional protection against heat loss in winter and overheating in summer. During extreme weather conditions, ensure the window is properly closed and secured to prevent damage from high winds or heavy precipitation. If you notice condensation forming between the panes at any point, this indicates seal failure and requires attention. By performing these simple maintenance tasks, you can expect your replacement pane to provide excellent service for many years, potentially extending the overall lifespan of your Velux window system without the need for complete replacement.